Easter is almost here, which means boiling eggs for dying. It took me many years to finally learn a trick to hard boiled eggs that are not only easy to peel, but that don't get that greyish color to the yolk.
It's all about adding a bit of baking soda to the water. Here is how I do it. I sprinkle a bit of baking soda in my pan, then put a bit of really hot water in (I let the faucet run until the water gets really hot). I mix that around to let the baking soda dissolve. Once that is done, I add my eggs, then add just enough water to cover them. I set the heat to medium or medium high and once the water starts to boil, I set my timer. I let the eggs gently boil for about 20 minutes. Everyone knows the next part; filling the pan with cold water and letting it over flow until the water is cool. I used to do all that; except the baking soda part, and my eggs were always greyish and super hard to peel. Now they are really easy to peel, and not grey at all. I am so in love with this little trick!
I am boiling some now to dye eggs after nap time today.

Tuesday, March 31, 2015
Spring Cleaning
Spring is upon on us, and we all know what that means; Spring Cleaning. The ritual of purging ourselves and our houses of the things we don't want or need. This week I have slowly started the process, and I'm sure it will take me at least another full week. It's so beautiful out that I don't really care to spend most of my time indoors. We have been going to the park almost every single day (and getting a little sunburn I might add).
I started my spring cleaning with the kids' rooms. We have a large storage area above all of our closets, and the areas above their closets was being used as a catch all for pretty much everything. I cleaned them out and organized the stuff that should be up there very nicely. We had so much stuff we don't ever use, and probably never will, and that should have never been saved. I mean honestly, we had old sheets that don't even fit our bed and a suspension kit for a vehicle we don't even own anymore! I also have been cleaning out their drawers and purging clothes. One of Bret's drawers had 10 pairs of 18 month size pants (he is almost 3 1/2 and hasn't worn 18m clothes for at least 6 months, if not longer). I went through Sophie's a couple weeks ago and gave anything that didn't fit away. It feels so nice! Next is purging our toys, which I try to do every few months because they have so many. I plan to do this with every room in the house, and our storage in the next week or so.
I love spring, the weather is awesome and it's beautiful. We can open all the doors/windows and get some awesome fresh air, the cherry blossoms are in full bloom, and everything is colorful. Spring is the time of new beginnings.
Saturday, March 28, 2015
You are awesome!
I just want to say to all the moms (and dads if you are reading this), that you are awesome. I feel like too often we moms judge each other, belittle each other, and feel the need to tell other moms what they are doing wrong. Not often enough do we stop and just say "you're awesome and you are doing good job". It's so easy to look at mom whose toddler is throwing a tantrum in the grocery store and think "Why doesn't she do something about it?", or "Why doesn't she just leave and come back later when he isn't throwing a fit?". I know because I have done it myself, but the fact of the matter is that we have no clue what is going on in that person's life. Maybe that toddler has autism and can't help it, maybe that mom just got news that a parent passed away, or maybe (if she is like me) her husband is deployed but they ran out of milk (or anything really) and she needs to get the grocery shopping done and doesn't really have other options. Maybe that person is having a terrible day, and a simple "it will get better" or "hang in there" would make it all that much better for them.
Just because someone doesn't parent the exact same way as us doesn't mean they are wrong. Every toddler, every mom, every family is different. What works for our family might not work for another family. Sometimes being a parent is kind of a double-edged sword. One person might get on a mom for not breastfeeding, while another person might get on a mom for breastfeeding past a year. No one will ever be fully satisfied, but the main point is no but that person has the full story, and it's really not anyone's business. If the baby is healthy and well fed, the source of the nutrients isn't a big deal. Parenting is hard, and confusing (especially for first time parents), we shouldn't make it any more difficult than it already is by always judging and belittling each other about parenting styles. I always felt bad that I couldn't breast feed Bret, especially with everyone shoving the "breast is best" line down my throat (yes, I do believe that, but that just made me feel that much worse about not being able to do it). I not only felt like it took away from the bonding process, but I felt like a failure, and other moms shoving that in my face just made me feel like a terrible mom. They didn't know that I tried, but that after latching and sucking for a minute or so, he would pull away and and scream like dying cat every single time I tried. They didn't know he wasn't gaining weight. They didn't know that after trying for weeks, and meeting with his doctor, and seeing that he still wasn't gaining weight, that both his doctor and I decided it was time to try formula. What I needed during that time was a hug, not a judgmental stare for giving my 1 month old a bottle of formula.
I know it's so easy judge and sometimes we don't even notice we are doing it, but we should all try our hardest not to do so. Most days I feel like I am doing everything wrong and that I am terrible mother, especially when the kids can't go 2 minutes without fighting, I have 4 loads of laundry I never got around to putting away, and my dining room floor is covered in Cheerios (even though I just vacuumed the day before). What I need on those days is someone to say "Hey, you aren't perfect, but you are a good mom". I'm sure that most of us feel like that, maybe the things we have going on are different, but we all feel like we aren't enough, like we don't do enough.
So next time you see a parent on the phone at the park, don't automatically go to "what a bad parent", maybe that was the only break from pretend play and toddler talk that parent got that day. Next time you are on a plane and hear a baby or toddler crying don't think "I wish she would figure out how to shut that kid up", think "poor kid he is afraid of flying" and "poor mom can't calm his fears because he is too young to understand". Next time you see a toddler having a full blown fit in public, give a reassuring smile, a hug, or just a "I hope your day gets better" (it can go a long way).
So, I say again "To all you moms, you are awesome. Keep your head high (even if you are still in sweats, your hair isn't washed, and you floor is a disaster), and know that just because you aren't perfect doesn't mean you aren't a good mom."
Friday, March 27, 2015
Spring crafts for preschoolers
My kids love crafts, and it is awesome way to keep them quiet when Daddy is on nights and needs to sleep during the day. Since Spring has definitely sprung here, most of these are revolving around that. We did 2 this morning that the kids loved. They were quiet, weren't fighting, and were even being patient (which means that they were awesome). We made some fluffy bunnies and name caterpillars.
Fluffy Bunnies
You will need:
cotton balls (lots of them)
Elmer's glue (I tried a glue stick at first and it was a major fail)
white/cream construction paper
crayon (or marker to draw eyes, nose, and mouth)
bunny template (I googled "bunny template" and found the one I liked and blew it up, then just held the paper up to the computer and traced the outline with a pencil).
scissors (to cut your outline)
Once I picked the template and traced it, I cut out 2 of them. I helped the kids draw the eyes, nose, and mouth on the bunnies' faces. I put a dab of glue on each cotton ball, then gave them to the kids to put on the bunny.
 It was funny to see how differently they did something so simple. Sophie did all her cotton balls in a perfect line, all right next to each other. Bret did his very randomly and with no set pattern.
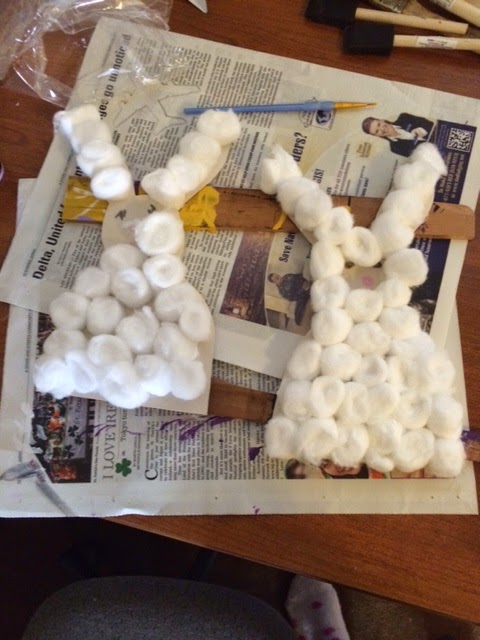 Sophie's is the one perfectly covered, Bret's is the one with missing spaces. I set them to the side to dry completely. Once the glue was fully dried I hung them on the fridge.
Name Caterpillars
What you will need:
colored construction paper
scissors
sharpie
crayons
glue stick
I cut out circles in colors I knew the kids would like (purple and pink for Sophie, blue and yellow for Bret, a different color for the head). I had the kids draw faces with crayons on the head circle, then I wrote 1 letter of their name on each other circle with a sharpie. I helped them glue them on, the head first, and then their name spelled out, ending at the head. We went over each letter (a few times) and went over what they spelled. After going over it a few times, I let them decorate the background papers.
 They really enjoyed the crafting/learning aspect of this.

 They were so excited to show Daddy when he woke up.
Fluffy Bunnies
You will need:
cotton balls (lots of them)
Elmer's glue (I tried a glue stick at first and it was a major fail)
white/cream construction paper
crayon (or marker to draw eyes, nose, and mouth)
bunny template (I googled "bunny template" and found the one I liked and blew it up, then just held the paper up to the computer and traced the outline with a pencil).
scissors (to cut your outline)
Once I picked the template and traced it, I cut out 2 of them. I helped the kids draw the eyes, nose, and mouth on the bunnies' faces. I put a dab of glue on each cotton ball, then gave them to the kids to put on the bunny.
Name Caterpillars
What you will need:
colored construction paper
scissors
sharpie
crayons
glue stick
I cut out circles in colors I knew the kids would like (purple and pink for Sophie, blue and yellow for Bret, a different color for the head). I had the kids draw faces with crayons on the head circle, then I wrote 1 letter of their name on each other circle with a sharpie. I helped them glue them on, the head first, and then their name spelled out, ending at the head. We went over each letter (a few times) and went over what they spelled. After going over it a few times, I let them decorate the background papers.
Thursday, March 26, 2015
Blanket Ladder
The most important thing you need to build an awesome blanket ladder is an awesome husband (unless you are super awesome with power tools, which I am not). Fortunately, I have an awesome husband who is super handy and good with power tools. In full disclosure, my husband did all the work on this one, I just told him what I wanted, the dimensions, and where I wanted it in the house. Other things you will need (aside from the awesome husband):
pallet (you will need to take it apart)
hammer (to remove nails from pallet)
sand paper (we used 40 grit)
wood stain (unless you want to keep it the original color)
wood glue
screws
clamps
The first thing we did was take the pallet apart and decide which parts we wanted to use. We used 2 of the longer, thicker 2x4's for the sides, and 4 planks for the ladder rungs. Next we cut them, we made it 23 inches wide so we cut the planks 23 inches (when I say "we" I mean he). We didn't cut much off the 2x4's, just cut them at a slant.
After cutting, we sanded them really well (this part I helped with). Pallet wood tends to have a lot of splinters so we sanded it really well with 40 grit sand paper and made sure we got every thing off. There were some holes from where we removed the nails. My husband learned a trick from a friend for filling holes in wood. He mixed a little bit of wood glue with the saw dust and made a thick paste and filled the holes with that. When it dries it dries pretty much the same color as the wood. It worked really well.
After sanding we stained it. Usually we use 2-3 coats of stain, but I really liked how it looked with just 1 coat (the stain we use is walnut). The top 2 rungs he put a small 2x4 behind and screwed that into the frame, then used wood glue to attach the rung (he did this for support on the top rung and bottom rung, and it worked amazingly). The middle 2 rungs have just a smaller block of wood behind them. The block of wood is glued to the frame, and the rung is glued to the blocks. We did the rungs at a slant because we liked the way it looked.
 I am totally in love with it, and it cleans up our living room.
pallet (you will need to take it apart)
hammer (to remove nails from pallet)
sand paper (we used 40 grit)
wood stain (unless you want to keep it the original color)
wood glue
screws
clamps
The first thing we did was take the pallet apart and decide which parts we wanted to use. We used 2 of the longer, thicker 2x4's for the sides, and 4 planks for the ladder rungs. Next we cut them, we made it 23 inches wide so we cut the planks 23 inches (when I say "we" I mean he). We didn't cut much off the 2x4's, just cut them at a slant.
After cutting, we sanded them really well (this part I helped with). Pallet wood tends to have a lot of splinters so we sanded it really well with 40 grit sand paper and made sure we got every thing off. There were some holes from where we removed the nails. My husband learned a trick from a friend for filling holes in wood. He mixed a little bit of wood glue with the saw dust and made a thick paste and filled the holes with that. When it dries it dries pretty much the same color as the wood. It worked really well.
After sanding we stained it. Usually we use 2-3 coats of stain, but I really liked how it looked with just 1 coat (the stain we use is walnut). The top 2 rungs he put a small 2x4 behind and screwed that into the frame, then used wood glue to attach the rung (he did this for support on the top rung and bottom rung, and it worked amazingly). The middle 2 rungs have just a smaller block of wood behind them. The block of wood is glued to the frame, and the rung is glued to the blocks. We did the rungs at a slant because we liked the way it looked.
Tuesday, March 24, 2015
Easter crafts
We have been doing a lot of Easter coloring lately. I let the kids color a bunch of pages and then we hung them up on door. My door might not look the prettiest, but it is the most festive on our floor. The kids love when I hang their artwork on the front door for everyone to see (I also did it for Thanksgiving and Christmas). I just Google Easter coloring pages, click on images and print off the ones that they like. Then they are free to color them however they want. It's pretty obvious which ones Sophia colored and which ones Bret colored. Bret still pretty much just randomly scribbles with the crayons, while Sophia tries her hardest to make it look pretty.
 Another Easter craft we did today we making Easter egg wreaths. I cut out Easter egg shapes in different colored construction paper (they are folded over so you can open them and write in them, but you don't have to do that). I also cut out a wreath shape on a piece. The kids decorated the fronts of the eggs (I helped a little, when they wanted polka dots or squiggly lines). After they decorated them I asked them what are some nice things they can do for others, and what things they really need to work on (ie, listening, not hitting, and so on). We wrote good things, and things they need to work on inside the eggs, then glued them to the wreath. After we were done we talked about why we celebrate Easter and all about how Jesus died for our sins and on the 3rd day he rose again. (Of course Bret didn't really listen to any of that, he just wanted to keep coloring, but Sophia got something from it.)
 We hung their wreaths on their bedroom doors. It was a fun way to make the house festive but also learn something.
Monday, March 23, 2015
Gallery Wall
So my wall is finally done! It took us a bit because we were doing too many things at once, and waiting on some things. While scrolling through Pinterest I found a wall that was perfect and that both I and my husband liked (that usually takes a while), unfortunately the link lead nowhere. I decided to just go for it. I looked at what frames I had, what I would need, and so on. I think the longest part was deciding what pictures I wanted in it and what size. I ended up with 5 8x10 photos, 5 5x7 photos, and 9 4x 6 photos (1 frame that holds 2, 1 collage frame, and 1 frame that holds 3). I also added an S, our clock, a sign, and a key. I used to floor to lay everything and arrange (and rearrange about a million times until I got something I liked).
 (All the ugly frames that don't match got painted, along with the S.)
 We had 8 of the frames, I bought 6 frames, and the key.
.JPG) My husband made the sign for me. He stained the wood for me, and painted the letters. Then he attached them with wood glue and hung it.
My husband made the sign for me. He stained the wood for me, and painted the letters. Then he attached them with wood glue and hung it.
Saturday, March 21, 2015
DIY decorative flowers
If you can't fake flowers to match what you are looking for, you can make some yourself and they are super easy!
Things you will need:
coffee filters (or cupcake liners, I used cupcake liners today)
pipe cleaner or floral wire
hot glue
food coloring (if you want to dye your filters)
If you want to dye them, that is the first step. To dye, I put about half a cup of water in a bowl, added the amount of food coloring I wanted and mixed. I let the filters sit in for a few minutes then transferred them to a rack set on top of paper towels for drying. **When I made flowers with coffee filters for my wreath, I put some water and food coloring in spray bottle and spritzed the filters.** Either way works well, one is just easier.
Once your filters are dry, gauge how many you need. Today I was making small flowers so I used 5-6 cupcake liners per flower. ** The flowers on my wreath are made with coffee filters and I used about 8 or 9 for bigger flowers.**
Once you have the amount of filters you will use, you will need to cut different sizes. For the smaller flowers I made today, I used 2 liners at the original size, 2 just a bit smaller (cut a small amount off the edge), and then 2 smaller. For the 2 smallest ones (which serve as the center) I folded them up like so:
 Once folded, I snipped at the edges randomly.
One that is done you need to rough the edges up with the sharp edge of a scissor to give them some texture.
 *These pink ones aren't dyed, I just had pink cupcake liners on hand.
Starting with the 2 larger liners, put a drop of hot glue in the middle, then add the second on top. Fold them a up a little. Add a drop of hot glue to the top and add the next size liner, repeat until you get to the 2 smallest. Fold the 2 smaller ones together like the picture and twist the bottom. Add a drop of hot glue to the middle and add it to the rest. Fold and scrunch it up a bit. Put a drop of hot glue on a pipe cleaner, or floral wire and press flower to it. The look I was going for was daffodils.
 I'm not quite done, I am still waiting on my blue ones to dry to make that flower. This is going to serve as the center piece in our table for Easter.
Here is what my other flowers look like:

Things you will need:
coffee filters (or cupcake liners, I used cupcake liners today)
pipe cleaner or floral wire
hot glue
food coloring (if you want to dye your filters)
If you want to dye them, that is the first step. To dye, I put about half a cup of water in a bowl, added the amount of food coloring I wanted and mixed. I let the filters sit in for a few minutes then transferred them to a rack set on top of paper towels for drying. **When I made flowers with coffee filters for my wreath, I put some water and food coloring in spray bottle and spritzed the filters.** Either way works well, one is just easier.
Once your filters are dry, gauge how many you need. Today I was making small flowers so I used 5-6 cupcake liners per flower. ** The flowers on my wreath are made with coffee filters and I used about 8 or 9 for bigger flowers.**
Once you have the amount of filters you will use, you will need to cut different sizes. For the smaller flowers I made today, I used 2 liners at the original size, 2 just a bit smaller (cut a small amount off the edge), and then 2 smaller. For the 2 smallest ones (which serve as the center) I folded them up like so:
One that is done you need to rough the edges up with the sharp edge of a scissor to give them some texture.
Starting with the 2 larger liners, put a drop of hot glue in the middle, then add the second on top. Fold them a up a little. Add a drop of hot glue to the top and add the next size liner, repeat until you get to the 2 smallest. Fold the 2 smaller ones together like the picture and twist the bottom. Add a drop of hot glue to the middle and add it to the rest. Fold and scrunch it up a bit. Put a drop of hot glue on a pipe cleaner, or floral wire and press flower to it. The look I was going for was daffodils.
Here is what my other flowers look like:
Thursday, March 19, 2015
Potty training
I have learned a lot since I first attempted potty training Sophia about 3 years ago. The first is, don't let people make you think that just because something worked for them, that it will also work for you. Every kid is different, every family is different. Also, don't let people think your child should be potty trained at a certain age. Go with your instinct. From talking to other mothers, I got the impression that girls are super easy to potty train and all girls should easily be potty trained by 2 years old. If only I go back in time and slap myself, it might have saved an almost year long struggle of potty training Sophie. We thought she was "ready" at 18 months. She didn't like diapers, she freaked out when she went potty in them, she liked the Elmo potty we got her. So, at 18 months we pushed, let me tell you...pushing a toddler than just isn't ready is a sure fire way to make it that much harder. She would scream bloody murder if we even sat her on the potty. We gave up quickly.
At 2 the daycare had a "sit down" with me and told me they were concerned because she wasn't potty trained yet. All the other kids in the class were (class was 2-3 years). She was also the youngest one in the room. We decided to try rewards at that point. Potty treats, too bad she peed under our table and begged for her potty treat. We again were forced to give up. Shortly after the daycare asked us to send her with pull ups (those things can be the devil). Eventually, a few months before she turned 3, I decided to try a diaper/pull up free weekend. We had a long 3 day weekend. I bought her princess undies and the only time she was put in a pull up was nap and bed. It only took 2 days. She still had accidents but her sticker chart worked for that. At first a sticker for every day she didn't have an accident, after a week, every 2 days. After another week, it was a week. After a month she only went off the potty during naps and bed.
Now, I thought she was difficult, but I recently learned just how not difficult she was. I had no intentions of attempting to potty train Bret until close to 3, but he made me think for a bit anyway, that he might sooner. I used to sit him on the potty at bath time around age 2, and he pooped on it almost every night. It seemed too good to be true (and it was). I got rid of Elmo after I realized how inconvenient a potty chair is. Sophie ended up not liking it and we bought one that clicked in the toilet that she much preferred. So when Bret started pooping the potty chair on a regular basis, I got rid of it (I was tired of sanitizing it multiple times a day). I learned he much preferred Elmo and he refused to potty without him, but he was long gone. I bought potty books, and Elmo's potty DVD, he didn't care. I gave up, but when visiting the states at about 2.5 my mom decided to try and he was doing ok, but it was random. We bribed him with toys, candy, stickers, we did diaper free (he peed on her door and her hardwood floor). Eventually we gave up again. After 3, I said ok, it's time now. We bought him super hero underwear and said ok, diaper free weekend. It worked for his sister, it should work for him, right? Ha! I can't even count how many times he peed in those. I would take him every 15 minutes, didn't matter he would still go in his undies. After 2 months I was ready to give up again. A friend of mine suggested the next time he had an accident in his undies to make sure that they got really wet (using water) so he knew how uncomfortable wet underwear are. That did it, well that and potty treats. It's been a couple months and he still had some accidents (mainly when he is having a lot of fun and forgets to use the potty).
Wednesday, March 18, 2015
Delicious Chicken Chili (edited with pictures and new ingredient)

*Disclaimer, I don't usually follow recipes, and for things other than baking, I don't really measure.
Here is my recipe for white chicken chili. My family loves this recipe so we make it often.
Ingredients:
1 package boneless skinless chicken (usually it's a little over a pound of chicken, you could probably use other chicken, but I never have)
14-16 oz chicken stock (I use Swanson's lower sodium)
Cumin
Chili powder
garlic powder
cayenne pepper
1 can white corn (you can use regular canned corn if you want, I do if I run out of white corn)
1 or 2 cans green chiles (you could use fresh, they just cost an arm and a leg here)
2 cans Great Northern beans
flour
butter
chicken bullion
1 cup milk
**New ingredient: 8 oz cream cheese
1. Place chicken in bottom of crock pot.

2. Sprinkle cumin, garlic powder, cayenne, and chili powder on top of the chicken. (If you aren't like me and feel more comfortable measuring, it's about 1 tsp per item.)


3. Pour chicken stock into crock pot (again, I don't measure so sometimes it's more, sometimes it's less).

4. Drain beans and corn and add to crock pot.

5. Add green chiles (I don't drain them).

6. This is where I added the 8 oz of cream cheese this last time, added in small amounts then mixed in. This makes it creamier in and delicious
7. Cook in crock pot on low for 4-5 hours.
8. 1 hour before serving, put about 2 tbsp butter in small sauce pan and melt. Once melted add the same amount of flour. Whisk for about 1 minute. Add 1 cup milk and 1 bullion cube and let simmer on med heat for about 2-3 minutes.
9. Add that to crock pot and stir well.
10. Cook on low 1 more hour.
We like to top it with a little sour cream and Fritos. We also added garlic greens cut up on top this last time and it added so much it.
Tuesday, March 17, 2015
DIY tile coasters
We have cheap ugly coasters, and I decided I was going to do something about it. I decided I was going to make my own. I looked up a few ideas, I thought the scrabble letter ones were kind of cute, and wine cork ones too. In the end I decided to go with tile, easy peasy. I had to order my tiles from Amazon, but most hardware stores sell them for pretty cheap. It didn't take much time to get them done, mostly it was waiting on them to dry. I made 6 with scrapbook paper and I have 4 left that are going to be beer ones, I just need to find some beer labels.
What you will need:
mod podge
tile squares (mine are 4x4)
scrapbook paper of your choosing
sealant (I used a spray sealant that is water resistant)
adhesive felt circles (to keep from scratching tables)
The first step is choosing your paper. I picked out 3 different ones because I wanted a variety. I have a lot left over, but that's ok. I basically made 2 coasters out of each sheet.
 These are the ones I chose .
After you have your paper, you can either trace the outline of the tile on the back side (having the paper go all the way to the edge of tile makes it harder to seal) or you can do what I did and just measure and make it just a little shorter. I measured at 3.5 inches instead of 4, then cut it out.
Once you have your scrapbook paper cut, apply thin layer of mod podge to the top of the tile. Quickly place your paper on top of it and get it centered and even. Push out air pockets with old credit card (or anything that will do the trick). Once you have it on there without air bubbles apply a layer of mod podge. Allow it to dry for about 10 minutes, then add one more layer (take it from and be sure to wipe any drips the the sides might look funny). Once the second layer is dry (10-15 minutes) spray it with a coat of sealant. I only did one coat, but I after use I am regretting it, and I will probably be adding another coat.
 Tile before.
 After.
Once the sealant is dry add felt circles to backs to keep them from scratching surfaces of your furniture. Once I acquire some beer labels my hubby will have some manly ones to use.
What you will need:
mod podge
tile squares (mine are 4x4)
scrapbook paper of your choosing
sealant (I used a spray sealant that is water resistant)
adhesive felt circles (to keep from scratching tables)
The first step is choosing your paper. I picked out 3 different ones because I wanted a variety. I have a lot left over, but that's ok. I basically made 2 coasters out of each sheet.
After you have your paper, you can either trace the outline of the tile on the back side (having the paper go all the way to the edge of tile makes it harder to seal) or you can do what I did and just measure and make it just a little shorter. I measured at 3.5 inches instead of 4, then cut it out.
Once you have your scrapbook paper cut, apply thin layer of mod podge to the top of the tile. Quickly place your paper on top of it and get it centered and even. Push out air pockets with old credit card (or anything that will do the trick). Once you have it on there without air bubbles apply a layer of mod podge. Allow it to dry for about 10 minutes, then add one more layer (take it from and be sure to wipe any drips the the sides might look funny). Once the second layer is dry (10-15 minutes) spray it with a coat of sealant. I only did one coat, but I after use I am regretting it, and I will probably be adding another coat.
Once the sealant is dry add felt circles to backs to keep them from scratching surfaces of your furniture. Once I acquire some beer labels my hubby will have some manly ones to use.
Monday, March 16, 2015
Tortellini Soup
Today I am going to share one of my family's favorite recipes: tortellini soup. We all love it and it is very easy to make.
Ingredients:
1 lb italian sausage
32 oz chicken stock
1 can petite diced tomatoes (with liquid)
6-8 oz softened cream cheese
1 package frozen tortellini
1. Brown italian sausage in skillet on medium heat and drain. It takes about 10 minutes.
2. Pour 32 oz chicken stock in crock pot with tomatoes and browned sausage. Add frozen tortellini to mixture afterward.
3. Add softened cream cheese in small chunks and stir until mixed in.
4. Cook on low in crock pot for 4-6 hours, then enjoy. It's delicious and great for cold rainy day!
It's hard to find things everyone in this house really enjoys, luckily this one of them. My husband who really doesn't like soup, loves it. My picky kids that just like to be difficult, love it. I love it. It's a win for everyone!
Saturday, March 14, 2015
15 minute DIY box spring cover.
I don't know about you, but I HATE bed skirts. They are a pain in the butt, when you wash bedding, you need to take the mattress off to get the bed skirt back on, and it moves and gets messed up the second the mattress moves on top it. My daughter has a full sized bed, but is not old enough to fix it herself, so I was sick of her bed skirt. I had seen some tutorials on Pinterest for do it yourself box spring covers. I had intended to hem one end and have it hang down like a regular bed skirt, but my sewing machine and I had a minor disagreement. So I know have a DIY no sew box spring cover that will take you about 15 minutes to do. First, you will need to measure your box spring. Sophie's bed is a queen and I ended up needing about 5 yards of fabric (since we live in Japan I had to buy in meters, but it was about 5 yards total).
Supplies:
staple gun and staples
fabric (the amount of yards you would need to cover the box spring plus a little extra, ours was 5 yards)
fabric scissors
iron
First I cut the fabric into the 4 strips I would need to cover it. I also cut 4 corner pieces, I didn't measure these. They don't need to be perfect, just enough to cover the corners. Next I ironed all the pieces to remove wrinkles. Now it's time to staple. I did the corner pieces first, staple each side to the box spring, top and bottom. For the sides, I folded each end over at the corner because I felt it looked a little better. Just remember to staple both sides if you don't hem the bottom. With cutting and stapling it took me about 15 minutes, it may have been faster if my husband had been able to hold the box spring while I stapled but he had just had surgery, so I was on my own.
Here is the finished look:
 And what it looks like with the mattress on top:
 I love it so much, I might do the same to our box spring!
Supplies:
staple gun and staples
fabric (the amount of yards you would need to cover the box spring plus a little extra, ours was 5 yards)
fabric scissors
iron
First I cut the fabric into the 4 strips I would need to cover it. I also cut 4 corner pieces, I didn't measure these. They don't need to be perfect, just enough to cover the corners. Next I ironed all the pieces to remove wrinkles. Now it's time to staple. I did the corner pieces first, staple each side to the box spring, top and bottom. For the sides, I folded each end over at the corner because I felt it looked a little better. Just remember to staple both sides if you don't hem the bottom. With cutting and stapling it took me about 15 minutes, it may have been faster if my husband had been able to hold the box spring while I stapled but he had just had surgery, so I was on my own.
Here is the finished look:
Friday, March 13, 2015
DIY Painted Frame Tutorial
I am currently working a gallery wall for our living/dining area. I had some older frames that didn't really match, so instead of buying all new ones I decided to just make the older frames match. It was very easy and they look great. I had scoured Pinterest for a painted frame tutorial but all I found was distressed frame tutorials (and my husband isn't into the distressed/rustic look), so I just decided to jump in and wing it.
What you will need:
Your old frames (or any frame)
Sand paper (I used a fine grit)
Paint of your choice ( I used a gold acrylic for 2 of my frames and a bronze spray paint for the other 2)
First cover your work area. Second step is sanding. Make sure you get the entire frame, make it nice and rough to give the paint something to stick to. This part was very messy. I sanded a black frame and I ended up with black covering my hands, my work space, and my clothes.
 ^ My frame after sanding. Looks terrible now, but it will look great in a bit.
The next step is to wipe off the frame. I used a damp paper towel to wipe my frames down. After you wipe your frames down it is time to paint. This particular frame I used the acrylic paint, so I needed a brush. For most of my projects I use foam brushes, but I decided to use an actual brush for this one.
It will take a few coats to look like nice, make sure you let each coat dry completely before adding another coat. The corners were tricky to get looking just right. I had to brush the paint at an angle at each corner which was difficult for me. After 3 or 4 coats it looked how I wanted.
 In some areas the black comes through a bit, but I felt like that gave it a bit more character.
For the other frames I used spray paint. Obviously with spray paint you want to do it in a well ventilated area like an open garage or shop, or just outside. We live in an apartment so I did on our balcony. Again, cover the area. I also put 2 small wood slats under my frame to keep the paint from sticking onto other things while drying. Here is what my frame looked like before:
 I sanded it really well and then did 2 coats of spray paint, letting it dry completely after each coat. Here is what it looks like now:
.JPG) There were a few drip marks, but I think imperfections are better. It took me probably about 4ish hours to do all four, and most of that was waiting on paint to dry, and only having enough room to do one frame at a time. The total cost wasn't much since I already had the frames and sand paper. I spent about 50 cents on a brush, around $2 on the acrylic paint, and $4 on the spray paint. I still have plenty left over for when I tackle the frames in my hallway too. I will definitely make another post when I finish the gallery wall. Right now we are still working on the sign for the centerpiece and one decorate piece.
There were a few drip marks, but I think imperfections are better. It took me probably about 4ish hours to do all four, and most of that was waiting on paint to dry, and only having enough room to do one frame at a time. The total cost wasn't much since I already had the frames and sand paper. I spent about 50 cents on a brush, around $2 on the acrylic paint, and $4 on the spray paint. I still have plenty left over for when I tackle the frames in my hallway too. I will definitely make another post when I finish the gallery wall. Right now we are still working on the sign for the centerpiece and one decorate piece.
I am currently working a gallery wall for our living/dining area. I had some older frames that didn't really match, so instead of buying all new ones I decided to just make the older frames match. It was very easy and they look great. I had scoured Pinterest for a painted frame tutorial but all I found was distressed frame tutorials (and my husband isn't into the distressed/rustic look), so I just decided to jump in and wing it.
What you will need:
Your old frames (or any frame)
Sand paper (I used a fine grit)
Paint of your choice ( I used a gold acrylic for 2 of my frames and a bronze spray paint for the other 2)
First cover your work area. Second step is sanding. Make sure you get the entire frame, make it nice and rough to give the paint something to stick to. This part was very messy. I sanded a black frame and I ended up with black covering my hands, my work space, and my clothes.
The next step is to wipe off the frame. I used a damp paper towel to wipe my frames down. After you wipe your frames down it is time to paint. This particular frame I used the acrylic paint, so I needed a brush. For most of my projects I use foam brushes, but I decided to use an actual brush for this one.
It will take a few coats to look like nice, make sure you let each coat dry completely before adding another coat. The corners were tricky to get looking just right. I had to brush the paint at an angle at each corner which was difficult for me. After 3 or 4 coats it looked how I wanted.
For the other frames I used spray paint. Obviously with spray paint you want to do it in a well ventilated area like an open garage or shop, or just outside. We live in an apartment so I did on our balcony. Again, cover the area. I also put 2 small wood slats under my frame to keep the paint from sticking onto other things while drying. Here is what my frame looked like before:
Subscribe to:
Posts (Atom)